tabs

Showing posts with label Crafts. Show all posts

Friday, October 10, 2014

Duct Tape Crafts

Big L's older cousin recently made him a duct tape shoulder bag.  Ever since then, he's been asking me to buy him duct tape.  Duct tape has come a long way since that grey colored tape I remember my dad using in his workshop.  These days it comes in all sorts of colors and patterns.  On a trip to the craft store, Lil P picked out a rainbow one for herself and a Star Wars one for her brother.  And since then, we've been on a duct tape crafting frenzy.

We started nice and slow with simple bracelets.  To make this we took a piece of duct tape long enough to fit around a wrist and folded it in thirds lengthwise.  Then we used some adhesive velcro so it was easy to take the bracelet on and off.  The velcro is not really necessary because duct tape is stretchy. 

Then Lil P wanted roses, which seemed daunting at first but turned out to be pretty simple-just repetitive.  I used instructions found here.  Basically take a 2" piece of duct tape.  Fold down the left top corner (leaving some of the sticky tape exposed) and then fold down the right top to make what looks like a house.  Wrap that around a stick or pencil and continue alternating where the points end up.  Continue until you get the size rose you want (about 20-25 petals).

Then Big L wanted something more masculine and after perusing images online, he decided on a wallet.  I used the instructions found here.  This wallet took a little more time than the rose but he totally loved it and it even has several small pockets for cards and a big pocket for all his cash. 

The finale to our duct tape frenzy were these braided bracelets with instructions found here.  It's really simple to make using a regular braid technique.  He doesn't have the hand strength to make it really tight yet but he got his first lesson in braiding.  

Tip:  While doing these duct tape crafts I found that the easiest way to handle the sticky duct tape was to tape it directly onto a cutting mat and use an exacto knife to cut all the pieces to the appropriate lengths and then peel off each one as needed. This worked especially well for the rose which required about 20 pieces of tape.  Alternatively, you can just rip off pieces of duct tape which works too. 

Happy duct tape crafting!

Thursday, May 22, 2014

"Souper" Teacher Appreciation Gifts

While browsing online for Teacher Appreciation gifts, I found this cute idea for Mason Jar Soups.  I've seen this done for cookies, but this was the first time I saw one for soup and decided to try a Minestrone Soup Mix that received excellent reviews.  I found the original recipe here.  I couldn't find red lentils so I added some red beans for color and used green lentils.

This is what the finished project looks like.  It was a fun project for the kids to measure and layer each ingredient.  And I thought it was unique and practical, so hopefully the teachers enjoyed the taste, as well as, the kid's efforts!

We layered these ingredients in the order listed into a 2 cup mason jar:
1/4 cup red beans 
1/4 cup lentils
1/4 cup split peas
1/4 cup barley
1/3 cup beef bouillon granules
2 tablespoons parsley flakes
3 tablespoons onion flakes
1/3 teaspoon thyme
1/3 teaspoon black pepper
1 teaspoon basil
1/4 cup pasta (in a bag so that it can be added to the soup at the end)

We attached a label mimicking the well recognized Campbell's soup label and added "Thanks for being a SOUPER teacher!"  We included a box of specialty bread sticks to eat with the soup.

On the back of the label, I added these cooking instructions and an ingredient list.
1.    In a large saucepan, combine 8-10 cups of water, a 28 oz can of crushed tomatoes  and entire soup mix (except for pasta).
2.    Add 2 diced carrots and 2-4 diced potatoes.
3.    Bring to a boil, reduce heat and simmer covered for 1 hour until peas are tender.
4.    Add pasta and cook until al dente. 


Wednesday, April 23, 2014

Easter Celebration

Resurrection Rolls
In the past, our Easter celebrations with the kiddies haven't included much more than dyeing eggs.  But now that they are older, I wanted to do something more meaningful that would help them understand the meaning of Easter.  So Easter morning I had the kids make Resurrection Rolls.  Here are the instructions.


Step 1: Gather marshmallows (I found extra jumbo sized ones at Target), melted butter, cinnamon sugar and crescent dough.


Step 2: Explain that the marshmallow represents Jesus, pure and sinless.  Dip the marshmallow in melted butter, which represents the anointing oils that were put on Jesus' body after he was taken down from the cross.  Coat the marshmallow in cinnamon sugar, which represents the spices rubbed on Jesus' body.  Wrap the marshmallow in a rectangle of crescent dough, which represents the tomb.  Make sure that all the seams are tightly pinched closed.  Bake at 375 F for about 15 minutes until golden.

Step 3: Cut open the "tomb" and explain that Jesus is not there (the marshmallow is "gone").  He has risen and is alive! 
 

My kids loved making and eating these Resurrection rolls.  Hopefully the message stayed with them!

Egg Coloring
We also did our traditional egg coloring with regular dyes (as opposed to more natural ones like I did in the past).  We dyed some and painted some.  I think next year we'll nix the painting.  The painted dye got all over my hands while peeling the eggs, and also all over baby T's mouth when he put one in his mouth!
Big L and Lil P intently painting their eggs
Chick in Egg Craft
I've always wanted to try this craft, and we had the perfect opportunity while the kids were on spring break.  The original instructions can be found here in Family Fun Magazine:

Step 1: Make a chick gluing 2 pom poms together and use felt to make eyes, a beak and feet.  Place the chick inside a balloon.  Inflate the balloon.

Step 2: Dip long strands of yarn or string in while glue.  Remove excess glue by sliding the string through your forefinger and thumb.  Wrap around a small balloon.  Let dry completely until firm and holds its shape. 

Step 3: Pop the balloon and carefully remove. 
Cute little chick in an egg!

Easter Baskets
Here are mini ones they made for themselves, again during spring break.  I just gave the kids a small pot, a bunch of stickers to decorate the pot, a cute egg and a bunch of candy to fill their baskets.

And, here are the ones that I gave them on Easter morning before church.

Happy Easter!

Friday, April 4, 2014

Princess P's 4th Cinderella Birthday

March is a crazy month of birthdays for my family.  In addition to all 3 kids, it's my father's birthday too.  So every weekend of March is booked with a celebration.  Lil P's was the last one to be celebrated, but certainly not to be forgotten.  As middle child myself, I understand the plight of the middle child and try to be conscious of her potentially feeling overlooked. 
  
Lil P loves princesses, so it was easy to pick a theme for her birthday.  Her favorite princess is Cinderella, but pink is her favorite color so I decided to do a pink, blue and white color theme. 

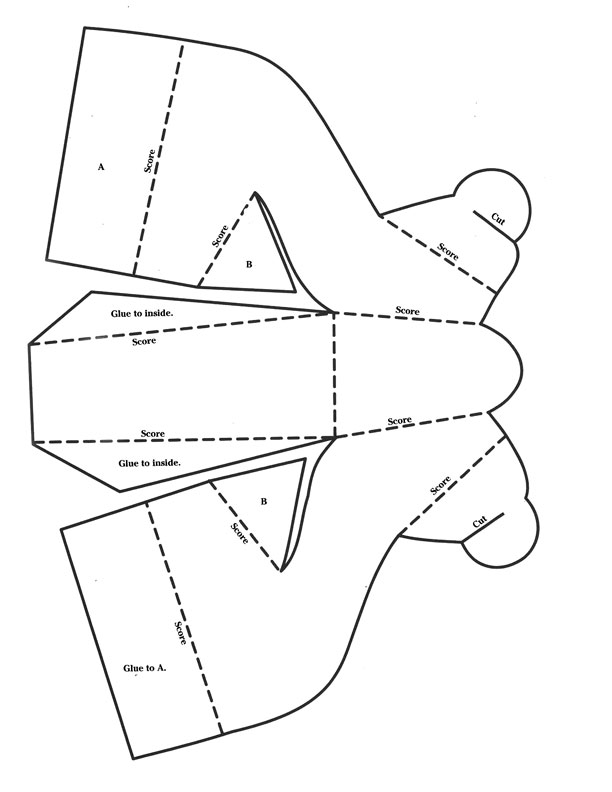
I made Cinderella slippers using a template for shoes I found here.  After lightening up the lines and removing the words (I preferred it not be visible on the finished product even if it's on the inside), I printed it on card stock, folded it up and embellished it with a rhinestone.  I filled the shoe with white sixlets.
Cinderella's slippers

Ombre cakes  have been quite trendy in the cake world, and I figured I would take a stab at it.  I also decided to try my hand at fondant ruffles--I don't know what says girly more than pink and ruffles.  Hopefully this was a cake worthy of a princess, at least worthy of my princess P. 

I also made Cinderella cupcakes using Magnolia Bakery's vanilla cupcake recipe (see here).  I printed images of Cinderella on card stock and cut them out just below her waste so that when inserted into the cupcake, the frosting looked like her dress.  I haven't been doing much piping since having delved into the world of fondant and modeling chocolate, so my hand got quite a bit of exercise piping each dot.
Cinderella cupcakes
For favors I made princess wands.  Here is a tutorial on making the wands and curling ribbon. 
Princess wands
Finally, I invited Cinderella from Bella Princess to come and entertain the kids. She was a huge hit.  She brought gowns and crowns for each girl and knight shirts and medallions for the boys.  She also did some minor face painting and led the kids in songs and activities (teaching the girls how to wave, curtsy, twirl and the boys how to bow and charge), preparing them for the coronation for Princess P.  After gathering the kids to sing Happy Birthday to Princess P, she made her graceful exit.

Dear Lil P,
You are one bright, sharp, passionate, and spunky little girl.  You love to be the center of attention except when it's unsolicited, then you shrink like a little flower.  You know all the words to "Let it Go" from the movie Frozen and love to belt it out with hand gestures and motions, using the stairs as your stage.  I don't know where you got your sense of theatrics, but perhaps one day it will land you in the entertainment field.  You are confident and independent and strong willed.  You will insist to the point of arguing what ever you believe to be true.  I hope and pray you will always stand this firmly by your convictions and beliefs.  While you love princesses, unicorns, and all things girly, you have no trouble keeping up with boys.  You have the loudest "ke-yah's" in TKD which always earn you many stripes in class.  And anything that your big bro does, you're just one step behind trying to do likewise.  At the same time, you love to look at yourself in the mirror while you twirl at dance class.  In addition to dancing, you love to sing, read, draw rainbows and flowers, and snuggle up next to me first thing in the morning.  You love baby T and shower him with hugs and kisses all day and like a caring big sister, will just sit with him and keep him company even without being asked.  Lil P, you bring so much joy to our family and we love watching you grow and develop as a little lady each day!
Love,
Mom

Saturday, March 29, 2014

Big L's 6th Batman Birthday

This year, Big L wanted a Batman themed birthday party at his Tae Kwon Do studio.  While he wanted to invite all his classmates, I decided to limit it to just the boys.  I've found that I prefer smaller parties because it allows the birthday boy more interaction with each guest, which makes it more fun for both Big L and his guests.

I made this invitation featuring Big L's face on Batman's body.

 I made labels for small water bottles since I figured the kids would be working up a sweat. 


For favors, I made personalized shirts using Jolee's iron on transfers which I picked up at my local craft store.  I also made bat signal flashlights by putting on a bat symbol on a black flashlight. The bat signals are a good idea in theory but are really only clear when the light is held close to the wall.  I couldn't find a cost-effective and easy solution to improve it but I figured at least the kids get a flashlight.

In keeping with tradition, I made a small cake for my Big L which featured the Gotham city skyline, a bat signal and Batman holding a happy birthday sign.

For the guests, I made cupcakes with the Batman symbol made out of modeling chocolate.

The party was a hit especially the board breaking, which every guest had the opportunity to try.  It really is such a confidence builder and some of the kids who were initially nervous about it were so happy and proud when they had successfully broken the board.

Dear Big L,
What a huge transition this past year has been and full of so many accomplishments!  You started kindergarten, made many new friends in our new home town including your best friend R, learned to read and write sentences, became a big brother for the second time and earned a striped black belt in TKD along with a "Best Student" badge.  You continue to amaze us with your knowledge, memory, creativity in building things out of any building toy, and your athleticism.  When you put your mind to something you really put in all your effort and energy and it often shows in the amount of sweat you produce!  You are so animated and we love to listen to you retell stories as you use big hand gestures and dramatic inflections in your voice.  You developed a sense of humor this year and love telling your own knock knock jokes.  I admire your self-confidence and that you don't care what others might say about the nail polish on your thumb or the particular shirt you wear.  You always repeat my words back to me that it doesn't matter what others think as long as you like it.  And I believe that you actually believe that to be true.  I hope you will always live with that same confidence and security in who you are.  You have a magnetic personality--adults find you endearing and many kids want to befriend you.  I even learned recently that a little girl in school has a crush on you.  You have a way of drawing people to you and I pray that God would use that to draw people to Him.  We love you!
Love,
Mom 

Monday, July 1, 2013

Baby T's Bek-il (100th Day Celebration)

This past weekend we celebrated my Baby T's 100th day of life.  One hundred days are significant historically in Korean culture due to the high infant mortality rates long ago.  I only recently learned that this is actually the 2nd of 3 significant celebrations in a child's life.  The first is at 21 days (which is a quiet affair because mom and baby are still in isolation at home) and the 3rd is the Dohl-1 year of life. 

Leading up to the Bek-il I was a little exhausted because big brother L was recovering from an adenoidectomy and BMT and required extra attention while experiencing side effects.  But I did want to prepare some decorations for baby T.  My little sister, the 3rd of the family, also reminds me regularly that I must not neglect #3 and give him just as much attention as I did for #1 and #2.

I decided to forgo the traditional table decoration with lots of fruit and rice cakes and went with something a little more simple.  I made hanging pom-poms a la Martha Stewart and suspended them from the ceiling.  I wanted to keep a blue theme but big bro L insisted on yellow flowers, so we picked up a bouquet of yellow gerber daisies and actually I'm glad I heeded his advice because I liked the contrasting colors.  I printed out the letters of his name on cardstock and stood them up on the table.  Finally, I picked up a strawberry shortcake from Whole Foods and used candy melt to make the 100 for the cake topper.

I catered food from Eun Ha Soo in Palisades Park.  I probably ordered a lot more than was necessary for 7 adults.  But I always like to have plenty of food and lots of variety.  And since this is potentially my last Bek-il, i thought I'd splurge for baby T. 

My lil' sister and parents drove up from VA and my big sister and her family also joined us for the occasion.
Lots of love for Baby T

Unfortunately, hubby was awfully sick on the day of the Bek-il but managed to crawl out of bed briefly for a photo with baby T.  Baby T was so excited to see daddy that he gave a nice big smile for the camera.

Baby T was so exhausted from all the excitement and attention that he went down for a nap while we all ate in his honor.  The big kids continued the celebration outside by breaking in the new Slip 'n Slide.  They came in famished and devoured all the mandoo.  See, it's a good thing I over-ordered food!

It was a great time celebrating baby T's 100 days of life and I am thankful for all the love surrounding baby T!

Tuesday, June 18, 2013

Cake Pop Flower Pots and My Little Sunflower

Yes, school has already ended but I'm just getting around to uploading pictures and blogging about this year's teacher appreciation gifts.  Around the time of teacher appreciation week, both of my preschoolers were doing a spring themed curriculum about planting and growing in their respective classes. So, I decided to go along with the theme and made cake pop flower pots for their teachers. 

The kids helped me make red velvet cake pops dipped in green candy melt.  We decorated some with sugar daisies, some with sprinkles and a some with some white chocolate drizzles.

We filled a small plastic pot with jelly bellies and inserted individually wrapped cake pops along with cute flower lollipops I found at AC Moore.  I wrapped the pot in cellophane to secure the jelly bellies and 6 flower pots later was ready for delivery to school.

The same day we delivered these, my Little "P" had a class show.  Here is my little sunflower giving an exuberant performance of  "You Are My Sunshine".  She really knows how to belt it out!

Saturday, January 26, 2013

Halloween Festivities 2012

I realize Halloween was 3 months ago, but I'm just catching up on my blogging and recording some memorable family moments so my kiddies can remember some fun times we shared as a family.

This was P's first Halloween parade at preschool.  She wanted to go as a princess and luckily she already had a stockpile of princess dresses at home, so we didn't have to buy one.

Our family likes to dress up together for Halloween.  I imagine as the kids get older, they won't want to dress up with us.  But luckily at this age, they still think it's fun.  So this year, we dressed up as the Incredibles. 

We had picked the biggest pumpkin we could find when we visited Riamede Farm.  The kids helped me carve it, using a simple stencil we found online. 

Our church had a Family Fall Festival and one of the games I prepared was this Pumpkin Bean Bag Toss, using a large box and some poster board for the pumpkin faces.

Here was another simple game idea using black and orange disposable cups, some pumpkin face stickers from Oriental Trading, leftover grass from Easter and some rings for the kids to toss onto the cups.


Finally, fall is never complete without caramel apples using this simple recipe here.


Friday, June 15, 2012

"Enjoy Summer" Teacher Appreciation Gift

Today was L's last day of school.  What a crazy start to the day!  I ended up having to walk him to school because the car battery had died.  I pushed P in the stroller and L on the glider straight uphill for 10 blocks and arrived all sweaty and panting, but I made it!  I really didn't want L to miss his last day of school and the opportunity to say good-bye to his teachers and classmates (and to give them their gifts!).  He was so sad yesterday when he realized he wouldn't have the same teacher anymore.  He really liked her!
  
So in preparation of this last day, I was wondering what kind of thank you gift to give L's teachers.  I found a cute gift idea here using plastic reusable cups that I love.  The cups are filled with instant lemonade and teas.  Little labels are placed on the straws that say "thank you for being a great ade for our class" and "thank you for quenching my thirst for knowledge".  Too cute!  This combined with some fun popcorn made a great "Enjoy Summer" gift.

These are the items that I picked up...16 oz BPA free glasses I bought here on Amazon, a couple boxes of lemonade and tea mixes (individually packaged for 16 oz of water), plastic popcorn containers, and jars of "Midnight Blend" popcorn (containing yellow and blue corn kernels).


"L" helped me assemble the cups with some green plastic grass on the bottom for color.  If I had vinyl and a cutter, it would have been cool to put the teacher's initials on the cups.  Then, I put the jars of popcorn in the cute containers and wrapped it with cellophane.

All of it went in white gift bags with the teacher's initials and "L" decorated them with pieces of tissue paper leftover from the last craft.

Here's "L" with his teachers!  Farewell Pre-K 3, moving on up to Pre-K 4!!

Wednesday, June 13, 2012

Flower Wrapped Favors

I was wondering what I should make for a garden-themed appreciation banquet.  I saw this really pretty way to wrap favors here and thought I would make these for the guests of honor.  They look kind of like mums. 

Instructions:
Step 1: Take a sheet of tissue paper and fold in half horizontally and then once vertically.
Step 2: Use template to trace the shape and cut out the tissue paper.  When you open it up, it should look like this:
a stack of the cut tissue paper

Step 3: Place wrapped candy/chocolate in the middle of 2 sheets.

Step 4: Wrap inner sheet around the candy and then wrap the second sheet around the first sheet. (I found doing it like this produces a fuller flower instead of wrapping the 2 sheets simultaneously.)

Step 5: Tie with a ribbon.

a rainbow garden of flowers
Pretty Pretty!!  I love the vibrant colors!

Monday, April 23, 2012

I Spy Bottles

If your kids are like mine, they probably have lots of little trinkets accumulated from birthday parties, gumball machines, church crafts, and other random places.  I realized just how much stuff my little ones have while scouring the house yesterday for items to use in these I Spy Bottles.
some trinkets

I came across this idea on Pinterest some time ago and like most things have had it hanging on a sky hook.  I finally got around to getting all the supplies together.  This activity is the perfect way to repurpose a plastic bottle and clean up all those trinkets lying around.

The Bottle:
The VOSS water bottle I used worked really well in terms of size and smooth exterior for the label.  The other bottle I used was a Nesquik bottle with a Tropicana cap (I thought I would just change it up a little).  The Nesquik bottle didn't have an adhesive label that required scrubbing or cleaning off, so it worked well.

The Filler:
Many blogs I saw used "Poly Pellets" or "Poly Fill Beads"--it's what is used in stuffed animals and dolls and supposedly easily found near the batting and poly-fill section of the craft store.  Unfortunately, my local AC Moore didn't have it.  Instead I found a product in the floral section that I thought could be easily substituted called "Crystal Fill".  Basically, you just want a filler.  Some people even use rice or colored rice.

The Trinkets:
While roaming around the store I found some cute themed buttons and alpha-beads that would make fun additions to the I Spy bottle.  You can also fill your bottle with common household items like coins, paper clips, small candles, really anything goes.  This doesn't help those prone to hoarding, but I guess for things like this it's good to hold onto that random board game piece, tires broken off of a toy car and those tiny keys to play locks.

The Label:
One blog mama (Pink and Green Mama) took pictures of the items inside the bottle and laminated the cards.  I thought that was a great idea.  Rather than risk losing the card, I decided to print the picture directly on a large label sheet and stick it directly to the bottle.

Another version is to make I Spy Bags (see homemade by JILL).  You can make your own bag with a clear plastic front or even easier is to buy pencil cases that go inside 3 ring binders and glue shut the zipper.

labeled I Spy Bottles ready for play